Hello! It’s been a while, hasn’t it? I’ve been in the midst of a whirlwind for the past few months – I started a fairly demanding new job in February, and on top of my usual activities, I was working on finishing up some more crocheted baby gifts for some of my lovely sisters at church.
I finally managed to sit down, upload and correct photos of my projects, and well, here I am!
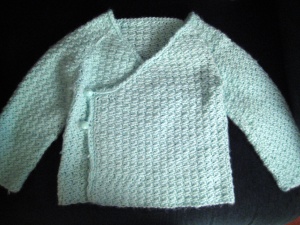
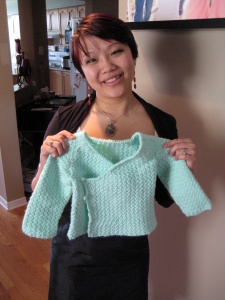
Having never made any clothing before, I was quite pleased with this first project, a minty green kimono top that I made for Brayden V. – who was born June 20, the day after my birthday! – and his momma Remmick, who’s an absolute sweetheart.With its neat raglan seams, it was a great piece for a novice like me to tackle. I started with my trusty Bernat #530199 Baby Gifts booklet and picked out the 12-month-old sizing for the relatively easy “Kimono Top” pattern:
…and using a skein of mint Bernat Baby yarn that I had left over from my bunny rattle project.
Making the actual pieces – sleeves, back, fronts – wasn’t difficult, although I may have lost count of stitches at certain points. (Anybody else have that problem? I can’t seem to talk and crochet at the same time without forgetting how many I’ve done…)
I did try out a new technique, a variation of the foundation single crochet method that I found on Pinterest (here’s an EXCELLENT tutorial), which was a bit challenging since I was working with alternating single and double crochet stitches in the first row. While it does take a little longer to get started, it does have a nice uniformity to it that you don’t usually see with a regular foundation chain (especially if you’re a beginner like me).
The toughest part was probably figuring out how to join the seams, since the booklet wasn’t very helpful on that front (“Sew raglan seams” was the extent of it). Figured it out, though:
As you can hopefully see from this photo, the diagonal top of the sleeve joins up with its corresponding arm/shoulder bits and then you fold it over to create the sleeve.
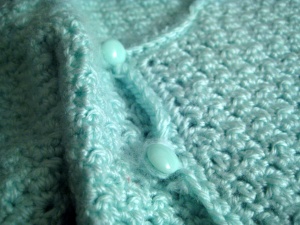
After a bit of a desperate hunt at Wal-Mart and various Michaels stores, I was thrilled to find some adorable matching buttons at Fabricland (along with the cutest daisy buttons for my next project, more on that shortly):
As an aside, did I mention I chopped off all my hair for the first time ever? Harrowing, although I’ve been wanting to get a pixie forever and had the support of a loving Husband and the ear of friends who had heard me jaw on about this for years.
One of these perpetually patient pals was the ever-graceful Andrea W., whose beautiful little girl Gabrielle was born just two days ago on July 2.
The arrival of Baby W. is a big deal in our church family, as Andrea is one of the few people still going to our church among the first generation of babies born to our members (the Husband is another). She’s also been a good friend over the years, so I wanted to try and make her something special.
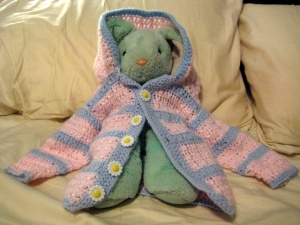
I turned to Ravelry for some ideas (you may recall I sourced the patterns for my baby quilt from there), and found this baby hoodie pattern from Coats & Clark:
The Ravelry entry showed a nice striped variation that looks pretty, so I decided to try that as well with the Bernat Baby pink yarn used in my earlier booties project and some random light blue yarn I found lying around. (I worked with the 6-month pattern.)
Again, the basic pattern is pretty easy, and the sleeve attachment instructions are a bit clearer here, although I definitely prefer the look of the kimono top’s raglan seams.
Didn’t manage to take too many pictures of the process, although I got a couple pre-hood:
I found the hood attachment process extremely challenging, to be honest. Again, a dearth of detailed instructions and lack of experience on my part made it a bit of a hair-puller. I think I might have preferred to leave it without the hood, but at this point I’d already committed to making it with it as I thought it added a special touch to an otherwise ordinary garment.
I did a LOT of Googling, but all I found was a tutorial for machine sewing a hood onto a regular cloth shirt – helpful enough for figuring out where to put the safety pins, but still not the greatest in figuring out bunching.
The best tip I got was from fellow needlecrafter and university friend Carlie Van A., who suggested threading a piece of yarn through the hood and pulling it tight-ish like a drawstring to get it to line up better with the neck of the shirt, since the hood is wider than the neck. Pretty good advice! Although I think I didn’t do it quite right… it ended up being more of a bonnet than a hood.
No pregnancies have been announced lately, so I think I will be taking a break from baby gifts for a little while, although I do have a crocheted birthday gift planned! Now may be a good time to concentrate on some of those other F-words (fitness comes to mind as I have definitely been getting flabbier lately!)


Amazing work, Krys. They look gorgeous!
Thanks Nat! They certainly took long enough… What projects have you been working on yourself?
They look amazing! You have quite a talent there!
[…] The lovely Gabby W. wearing the hoodie I made for her in this post: […]